Recently there were some updates to the Bravenet Mailing List Service. So we thought this would be a good opportunity to show you how to redesign your newsletter header to make it more custom.
Sending out newsletters is an excellent way to keep people up-to-date. The reasons for sending a newsletter are endless, so use your imagination and have fun!
First thing, do you have the Mailing List Service? If not, get it here.
Now get ready to start editing your newsletter. Log into Bravenet and get into the Mailing List Service Manager. From there, click 'Create an Email' and select the first method of creating a newsletter, 'Email Builder'.
Next we need a topic, it can be anything you like - I am going to make mine about my summer vacation at the beach.
Now that we have our topic picked, we can create a header. I am going to create my header using some of the free Bravenet Stock Photos. If you have Professional Hosting you can download free stock photos from the 'photos' tab that appears when you are logged in. Don't have Pro Hosting? Sign up here and start downloading free stock photos.
If you want your header image to fill the entire width of your newsletter you must first set the width of your newsletter. From the HTML Email Builder screen click 'edit layout', click the settings tab at the top. Here you can edit your width. I have made mine 650px - for the rest of this issue of Tips and Tricks I am going to assume you have done the same. The height of your header image is not important.
NOTE: you can change the layout of your newsletter using the 'Layout' tab that is found under the 'Edit Layout' link as well.
There are two different ways you can make your header. You can edit/create it yourself in an external third party program or you can upload a full size image and then crop it using the Bravenet Crop Tool.
Creating your Header:
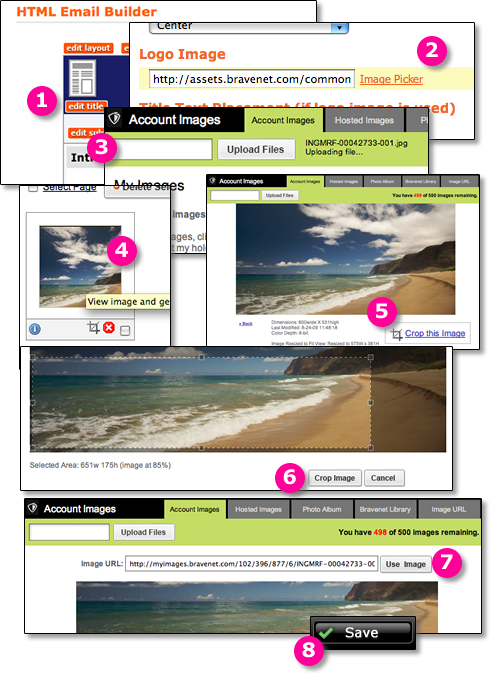
1. From the Mailing List Service Manager click 'edit title'.
2. Under the 'Logo Image' section click 'Image Picker'.
3. Upload your image using the box at the top of the windows that pops open.
4. Once your image is uploaded, click the thumbnail for your image.
5. To crop your image, click the 'Crop this Image' link.
6. Now you can drag and expand the box on your image to crop it to size. Remember to
make it 650px wide to fill the entire header. When you are finished, click 'Crop Image'.
7. A new thumbnail is then created for your cropped image, click the new thumbnail.
Then click 'Use Image'.
8. Click Save.
If your header image is pre-made and already the correct width then skip steps 5, 6 and 7.
(continued below)


1 komentar:
Complaints are the greatest offerings that God obtains from human beings, as well as the most faithful prayers human beings might utter to God.
Car Ornaments
Auto Locksmith Tools
LAUNCH X-431
Post a Comment